Unreal Engine 4 Plugins
Only available for Unreal Engine: 4.26 4.27
This guide is meant to be a general integration guide that you can use as reference when integrating any plugin from the Unreal Engine Marketplace which are mainly non-GAS-based plugins.
As an example, this integration guide will show you how to integrate a free plugin called AGR PRO with the TwistedBytes Interaction System, so that you can use both in combination in your own projects.
All steps described here should be applicable to other non-GAS-based plugins.
Requirements
- Microsoft Visual Studio C/C++ IDE and Compiler (Free Community Edition 2019 is sufficient)
- Unreal project must be based on Unreal Engine 4.26 or 4.27
Adding Engine Plugins to a Project
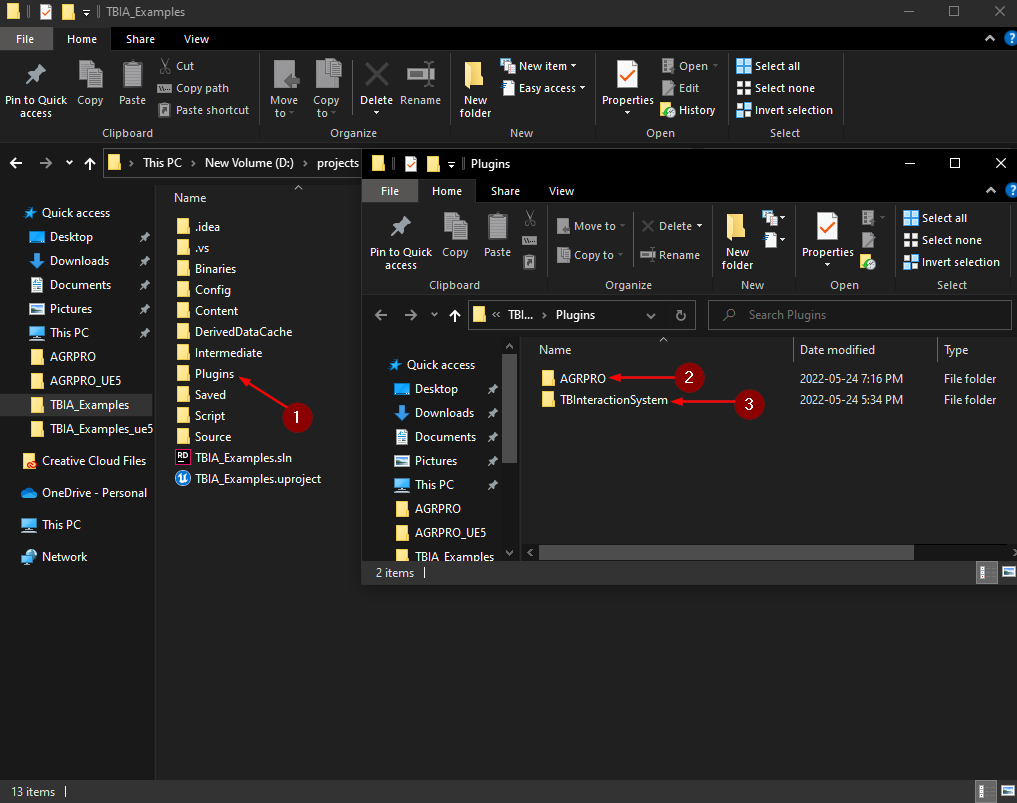
To get started, go to your project's folder. Create a new folder called Plugins in case it does not exist yet 1.
Copy both plugin folders AGRPRO 2 and TBInteractionSystem 3 from the Engine Plugin folder to your project's Plugins folder.
note
The default location of the engine plugin folder for Unreal Engine 4.26 is:
C:\Program Files\Epic Games\UE_4.26\Engine\Plugins\Marketplace
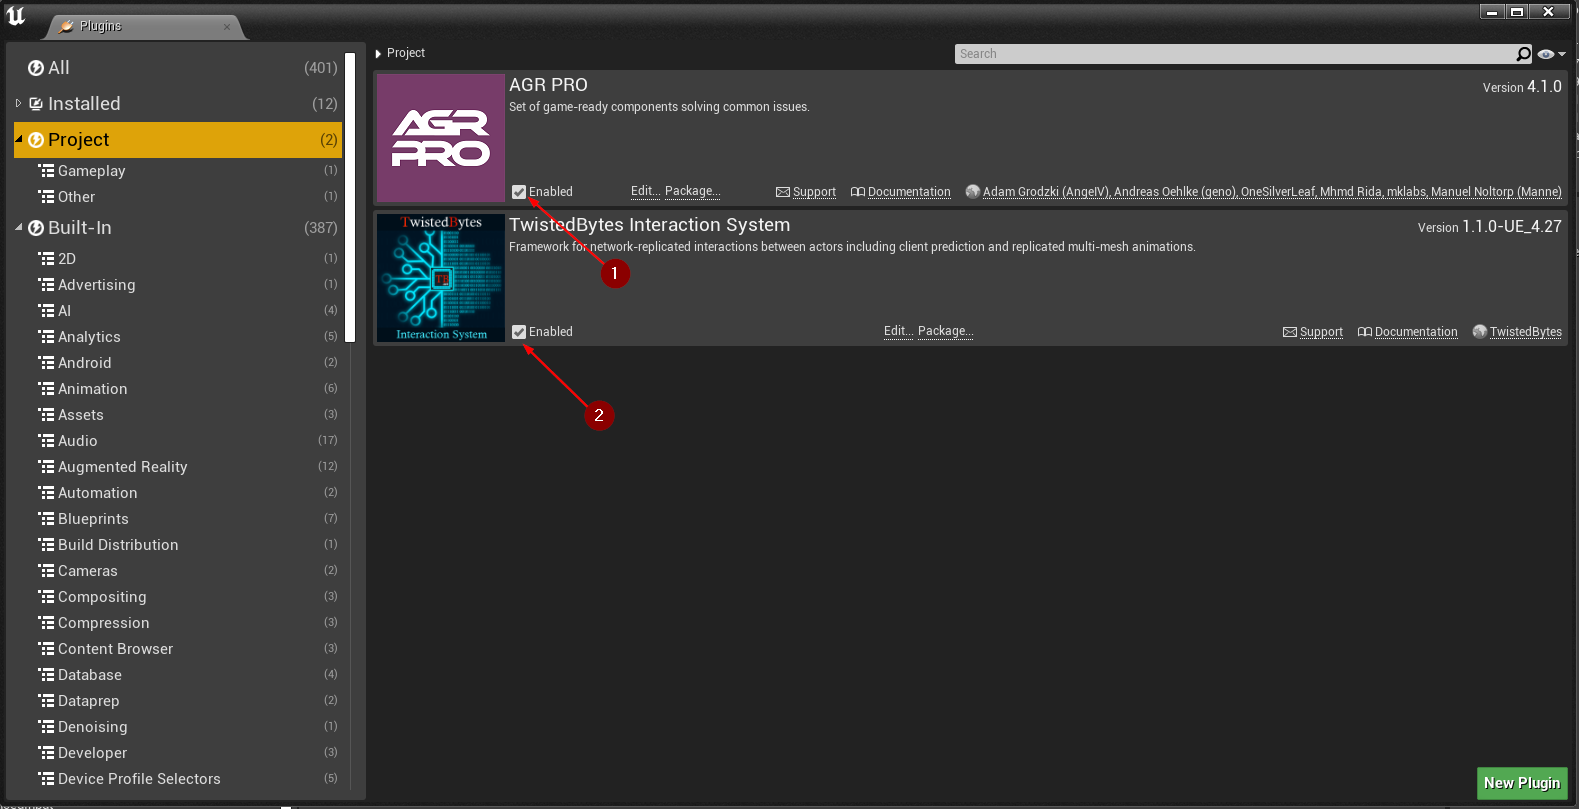
In your project, navigate to Edit | Plugins to open the Plugins tab.
Make sure that both AGR PRO 1 and TwistedBytes Interaction System 2 show up and are enabled.
Create Custom Character Class
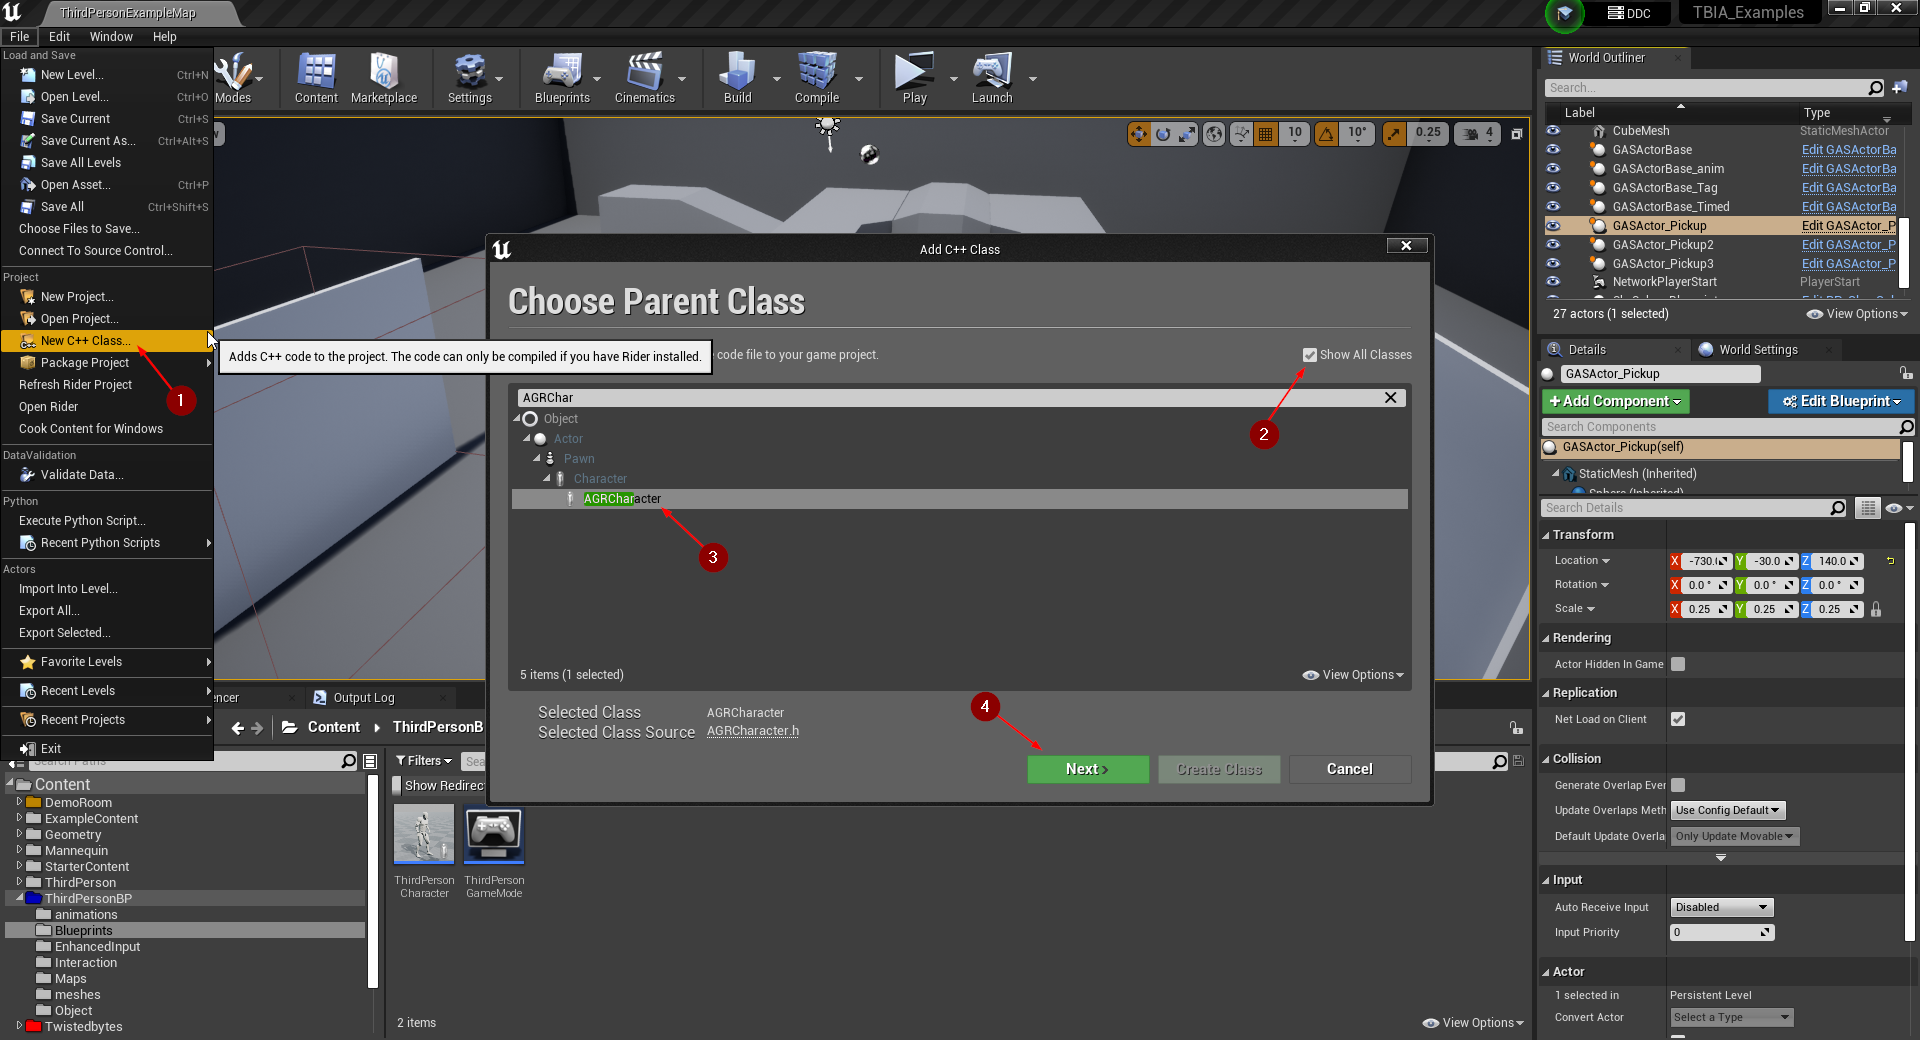
To create your custom character class navigate to File | New C++ Class... 1 in the Unreal Engine Editor.
In the Add C++ Class dialog, click on Show all Classes 2 then in the search dialog look for AGRCharacter and
select it 3 and click next 4.
In the next page you can name your class 1. In our case let's name it MyAGRCharacter.
Lastly, click on Create class 2.
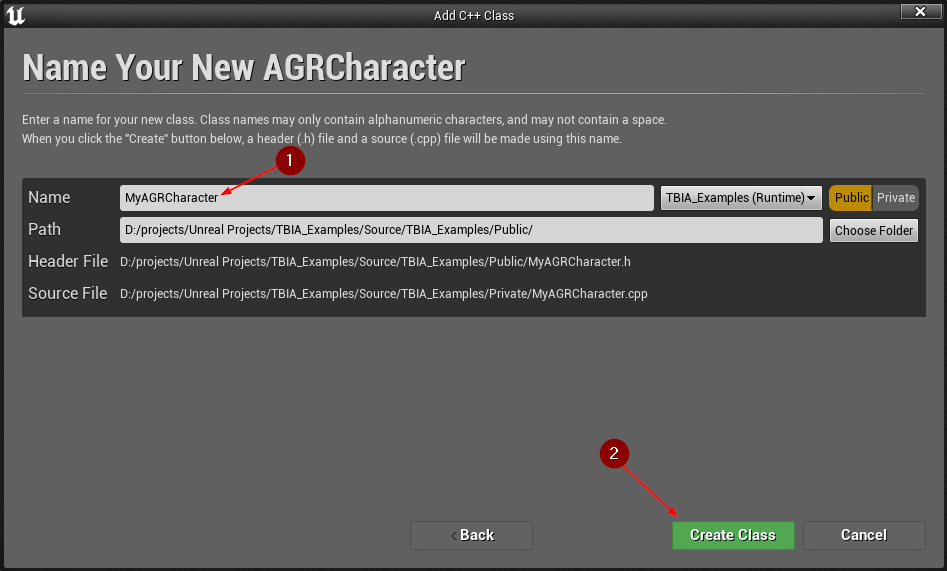
Wait for the Editor to create and compile all source files needed before proceeding.
info
The process described above is a quick way to create a new and valid C++ module that in fact turns any Blueprints-only Project into a C++ Project.
Modifying Project Files
The next steps describe how to modify the project C++ files, so that it knows about AGRPRO plugin, TwistedBytesInteractionSystem plugin,
GamePlayAbilities and their base classes to seamlessly integrate them with each other.
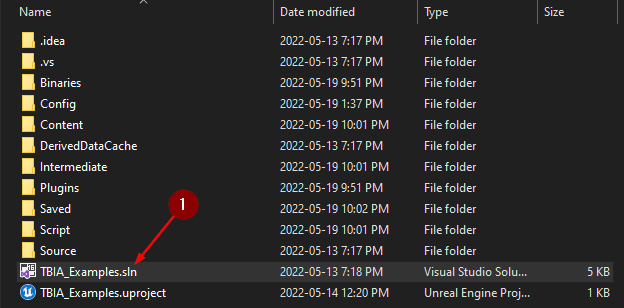
In Windows Explorer, navigate to your project's root folder. You should see a new file with the file extension .sln.
Double-click this Solution file 1 to open it in your favorite IDE (e.g. Microsoft Visual Studio or JetBrains Rider).
note
The initial startup will take some time. Might be a good time to grab a ☕ ...
Modifying Project's Build.cs File
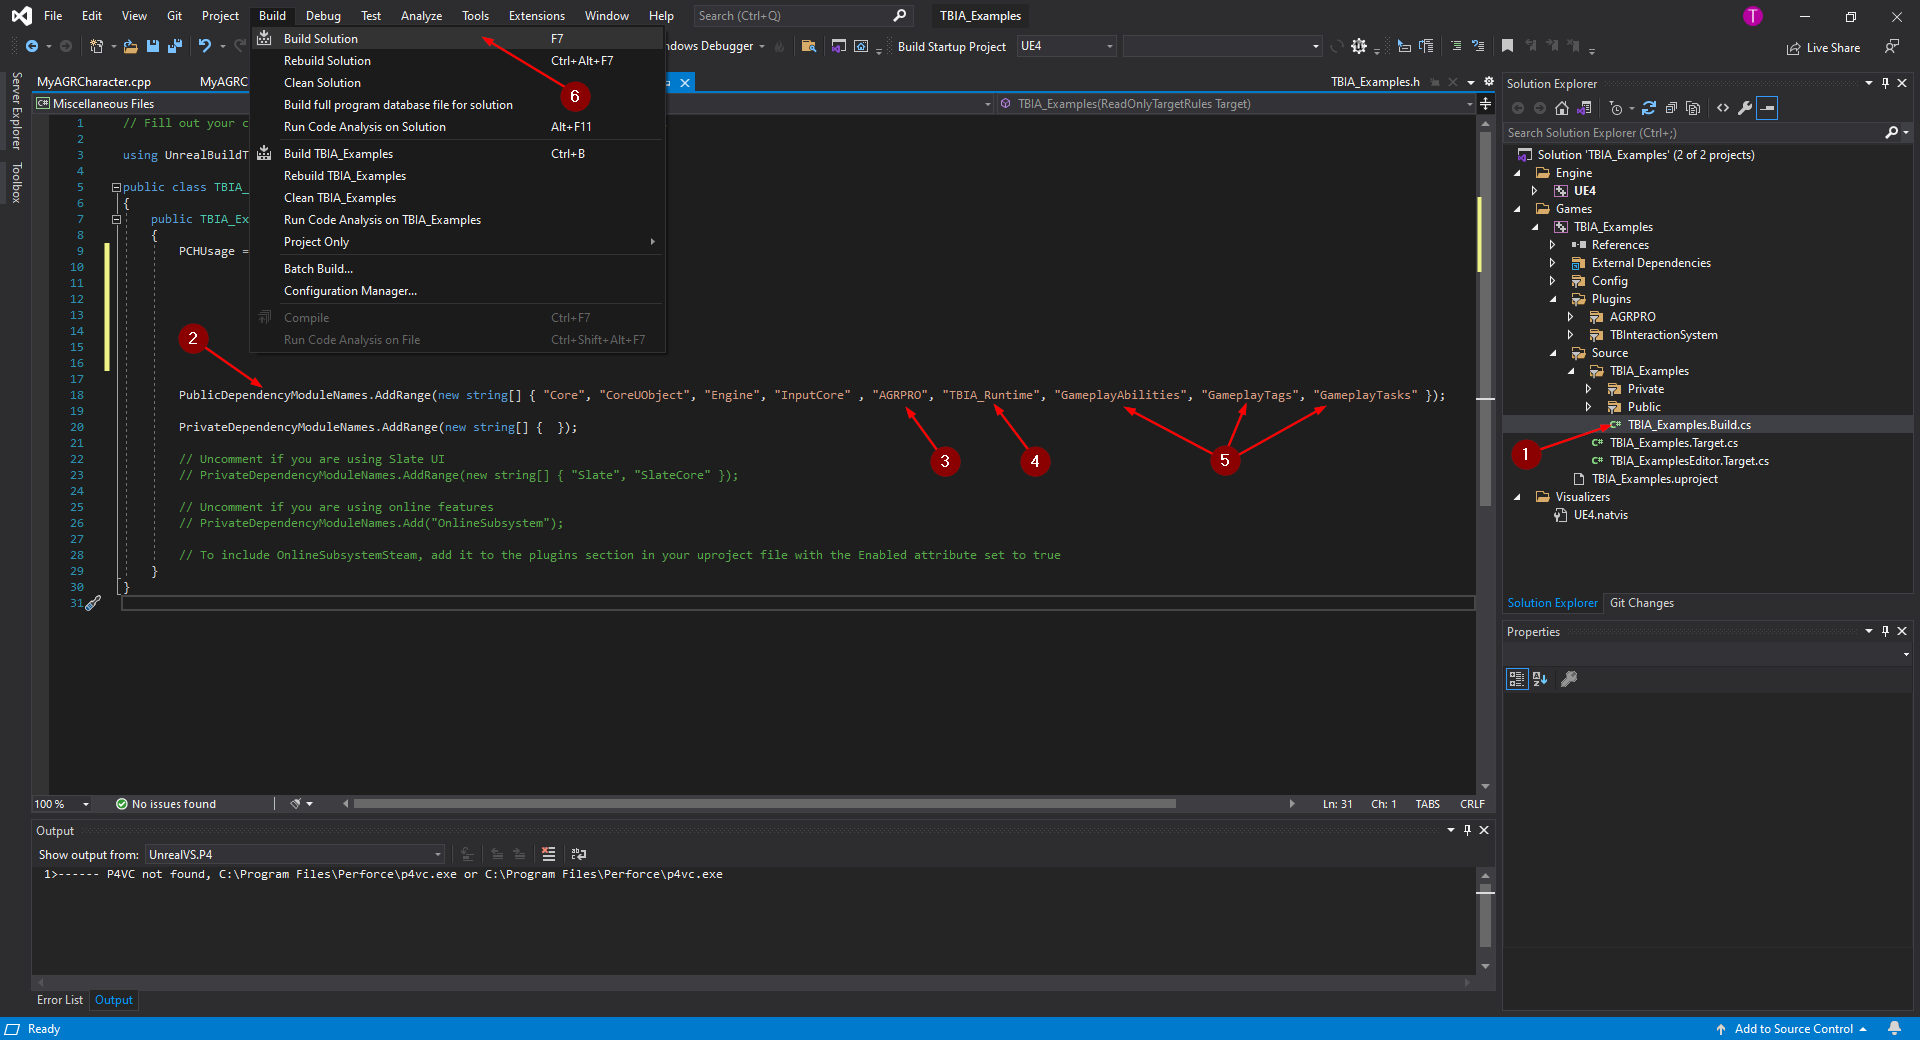
Next, navigate to <Games>/<Project Name>/Source/ and open the file <Project Name>.Build.cs 1.
Under PublicDependencyModuleNames 2 add :
AGRPRO3TBIA_Runtime4GameplayAbilities,GameplayTags,GameplayTasks5.
Click on Build Solution 6 and wait for the project to finish building (it might take a couple of minutes).
Modifying MyAGRCharacter Header File
In <Games>/<Project Name>/Source/Public/,
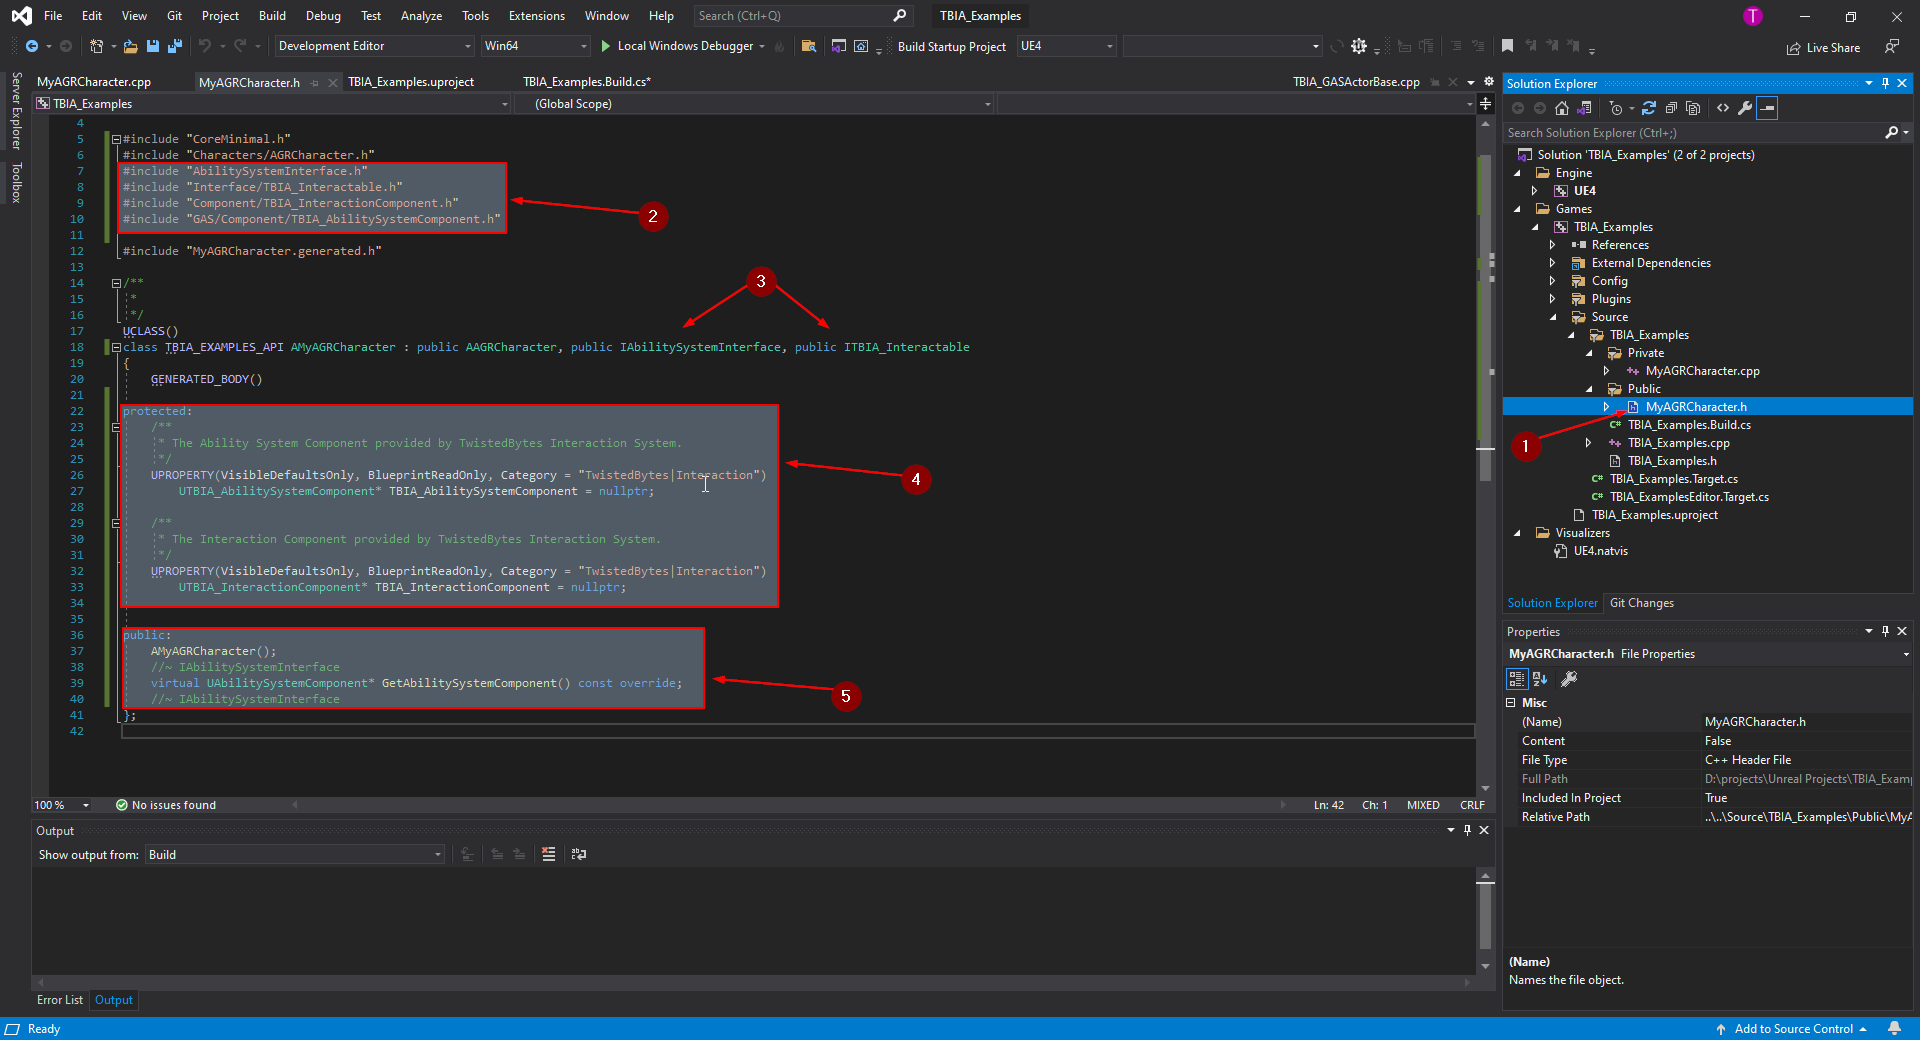
open the file MyAGRCharacter.h 1.
At the top of the file, add the following lines (see 2):
#include "AbilitySystemInterface.h"
#include "Interface/TBIA_Interactable.h"
#include "Component/TBIA_InteractionComponent.h"
#include "GAS/Component/TBIA_AbilitySystemComponent.h"
After this, go to the Class Declaration of AMyAGRCharacter and add these two interfaces 3 as shown in the image below.
public IAbilitySystemInterface, public ITBIA_Interactable
Then scroll down and inside AMyAGRCharacter, we want add the components TBIA_AbilitySystemComponent and TBIA_InteractionComponent.
You can do that by copying and pasting the code 4 as shown in the image below.
protected:
    /**
     * The Ability System Component provided by TwistedBytes Interaction System.
     */
    UPROPERTY(VisibleDefaultsOnly, BlueprintReadOnly, Category = "TwistedBytes|Interaction")
        UTBIA_AbilitySystemComponent* TBIA_AbilitySystemComponent = nullptr;

    /**
     * The Interaction Component provided by TwistedBytes Interaction System.
     */
    UPROPERTY(VisibleDefaultsOnly, BlueprintReadOnly, Category = "TwistedBytes|Interaction")
        UTBIA_InteractionComponent* TBIA_InteractionComponent = nullptr;
And under that we need to add the constructor and also override the inteface function GetAbilitySystemComponent
which is needed to get a reference to the Ability System Component used by GAS.
Copy and paste the following code as shown in 5
public:
    AMyAGRCharacter();
    //~ IAbilitySystemInterface
    virtual UAbilitySystemComponent* GetAbilitySystemComponent() const override;
    //~ IAbilitySystemInterface
Modifying MyAGRCharacter CPP File
In <Games>/<Project Name>/Source/Private/,
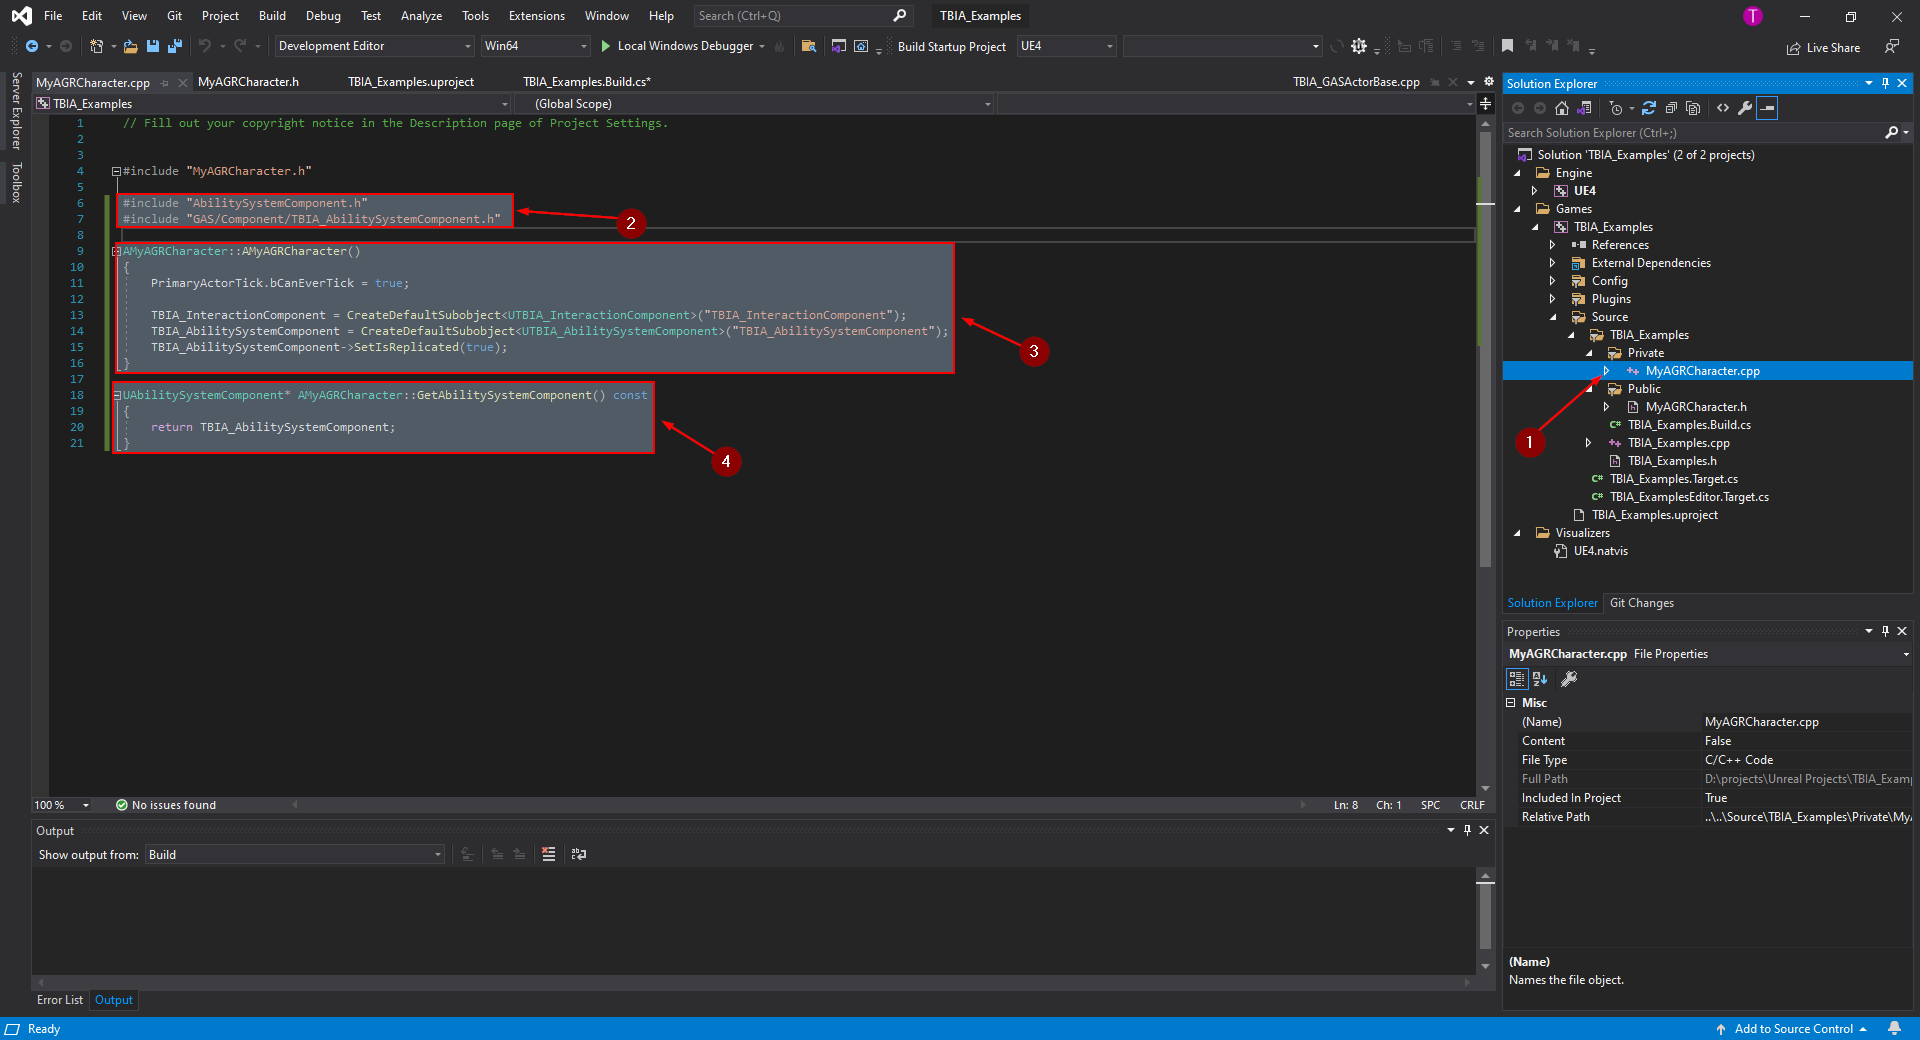
open the file MyAGRCharacter.cpp 1.
At the top of the file, add the following lines (see 2):
#include "AbilitySystemComponent.h"
#include "GAS/Component/TBIA_AbilitySystemComponent.h"
Under that we want to define the constructor to create the components we declared in the header file. You can do that by adding the following code as shown in 3.
AMyAGRCharacter::AMyAGRCharacter()
{
    PrimaryActorTick.bCanEverTick = true;

    TBIA_InteractionComponent = CreateDefaultSubobject<UTBIA_InteractionComponent>("TBIA_InteractionComponent");
    TBIA_AbilitySystemComponent = CreateDefaultSubobject<UTBIA_AbilitySystemComponent>("TBIA_AbilitySystemComponent");
    TBIA_AbilitySystemComponent->SetIsReplicated(true);
}
Then we want to add the implementation for the overridden interface function GetAbilitySystemComponent as shown
below in 4.
UAbilitySystemComponent* AMyAGRCharacter::GetAbilitySystemComponent() const
{
    return TBIA_AbilitySystemComponent;
}
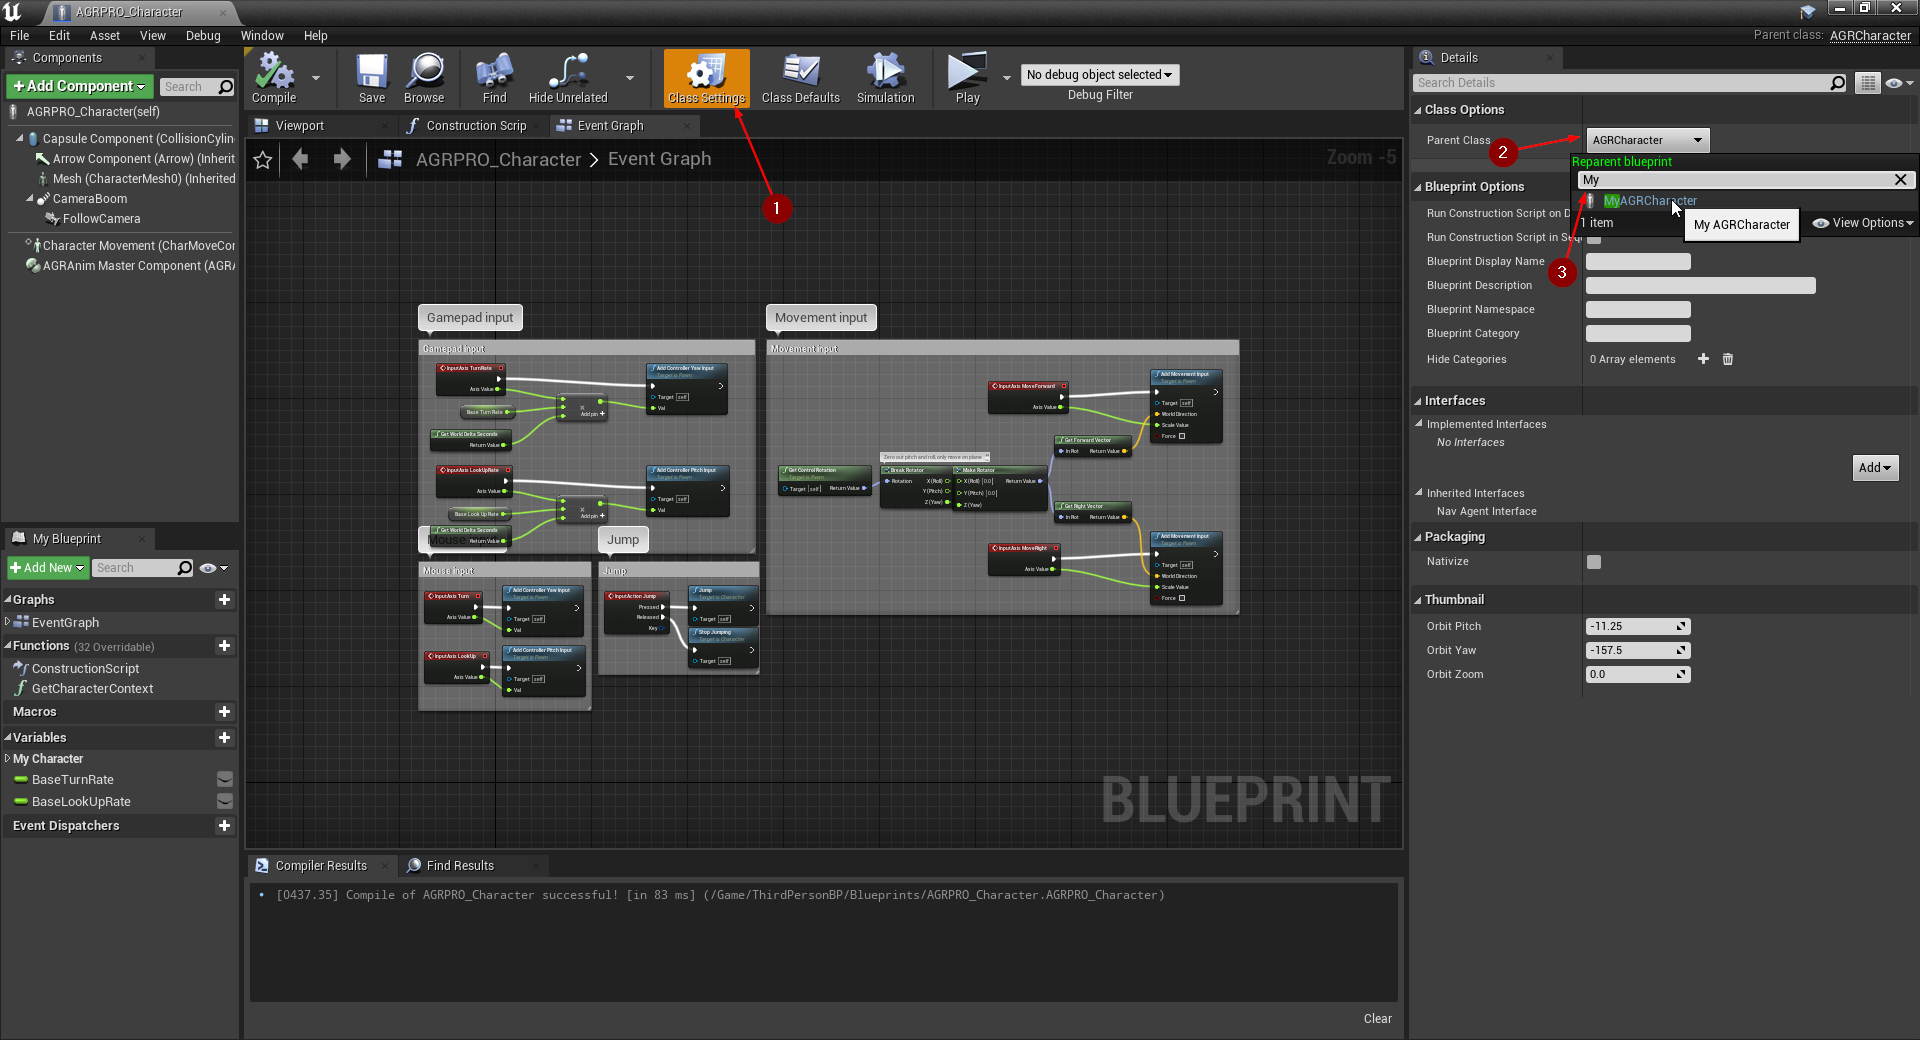
Setting up the Player Character
Open your Player Character Blueprint (e.g. AGRPRO_Character). As you can see here in our
example, we are using AGR Character as the parent class.
Go to the Class Settings 1 and click on Parent Class 2 select the
MyAGRCharacter class 3 like shown in the image below.
Finally, you can go to TBIA_InteractionComponent 1 add your interaction abilities 2
then setup your input 3 regarding the default input component you're using.

note
For more info on how to configure interaction abilities you can start from here
Finally you can press Play and test.