Lyra
Only available for Unreal Engine: 5.0+
This integration guide will show you how to integrate Lyra with TwistedBytes Interaction System, so that you can use both in combination in your own projects.
We would like to highlight the aim of this integration guide is make the TwistedBytes Interaction plugin become part of the Lyra project and not the other way around.
Requirements
- Unreal Engine 5.0 or higher
Lyra Starter Gameproject or your own project based on it- An IDE (e.g. Visual Studio or Rider)
Project preparation
note
In this guide, we are going to use Unreal Engine 5.1.
Please adjust mentioned paths accordingly if your project is using a different engine version.
First, copy the installed TwistedBytes Interaction plugin from Unreal Engine
(e.g. C:\Program Files\Epic Games\UE_5.1\Engine\Plugins\Marketplace\TBInteractionSystem\) ...
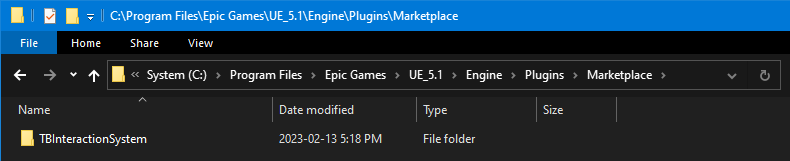
... to your project's Plugins directory.
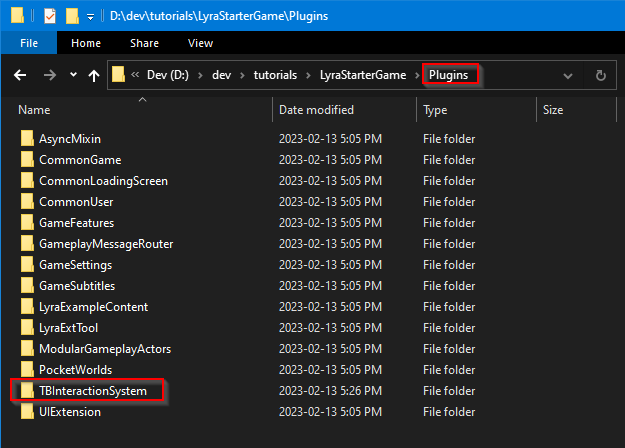
Next, go to the root directory of your project.
Right-click on the file LyraStarterGame.uproject and select Generate Visual Studio project files.
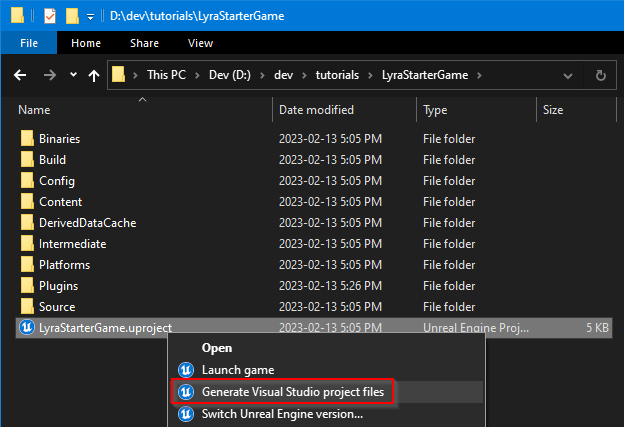
This will generate all necessary files for you to be able to open and compile the project successfully.
Now, open the generated solution file called LyraStarterGame.sln in your IDE of choice.
Modifying the TBIA plugin
You will need to modify a few files of the TwistedBytes Interaction plugin.
Step 1: TBIA_Runtime.Build.cs
In order to successfully integrate TBIA with Lyra we will need to set up a new dependency in the TBIA plugin.
Open the file Plugins/TBInteractionSystem/Source/TBIA_Runtime/TBIA_Runtime.Build.cs and add LyraGame to
the PublicDependencyModuleNames 1 like this:
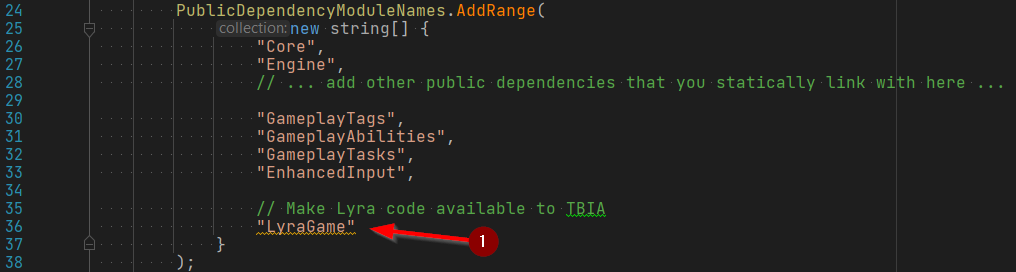
After this change, you will need to re-generate files again like before:
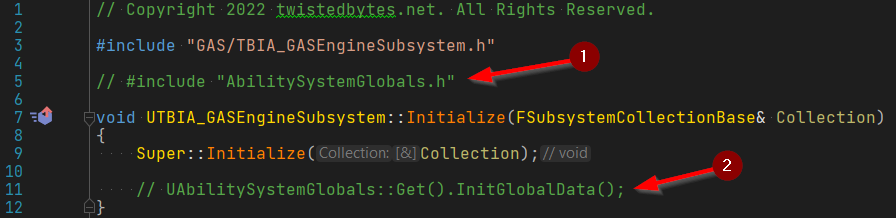
Step 2: TBIA_GASEngineSubsystem.cpp
TBIA manages the initialization of the Gameplay Ability System for you in the background. However, Lyra does this already, so we want to disable it in the TBIA plugin.
- Open the file
Plugins/TBInteractionSystem/Source/TBIA_Runtime/Private/GAS/TBIA_GASEngineSubsystem.cpp. - Comment out the lines where we include
AbilitySystemGlobals.h1 and where we call theInitGlobalData()function 2. - After the change your source code should look similar to this:
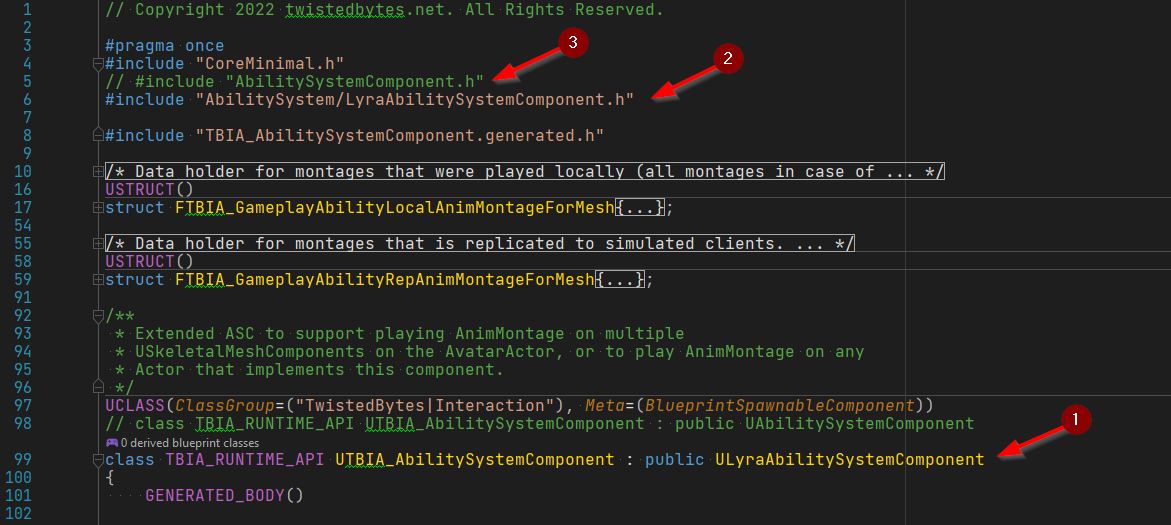
Step 3: TBIA_AbilitySystemComponent.h
TBIA sub-classes the Gameplay Ability System's ASC (Ability System Component). Since Lyra has its own sub-classesd ASC
we need to reparent TBIA's ASC to integrate it correctly into all systems.
- Open the file
Plugins/TBInteractionSystem/Source/TBIA_Runtime/Public/GAS/Component/TBIA_AbilitySystemComponent.h. - Find the declaration of the
UTBIA_AbilitySystemComponentclass and change its base class of fromUAbilitySystemComponenttoULyraAbilitySystemComponent1. - Also include the corresponding header
AbilitySystem/LyraAbilitySystemComponent.h2. - Lastly, let's comment out the inclusion of the
AbilitySystemComponent.hheader file 3.
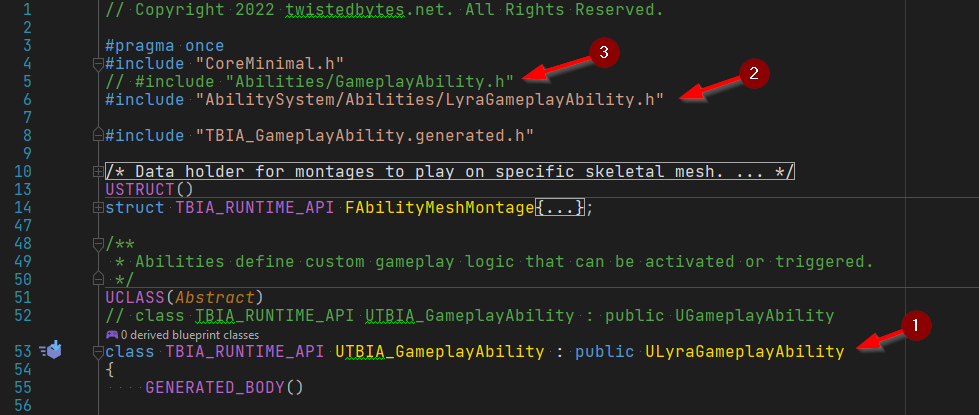
Step 4: TBIA_GameplayAbility.h
Similar to step 3, we need to take care of the same sub-classing situation for the Gameplay Ability base class.
- Open the file
Plugins/TBInteractionSystem/Source/TBIA_Runtime/Public/GAS/GameplayAbility/TBIA_GameplayAbility.h. - Find the declaration of the
UTBIA_GameplayAbilityclass and change its base class of fromUGameplayAbilitytoULyraGameplayAbility1. - Also include the corresponding header
AbilitySystem/Abilities/LyraGameplayAbility.h2. - Lastly, let's comment out the inclusion of the
Abilities/GameplayAbility.hheader file 3.
Preparing Lyra's Hero Blueprint for usage with TBIA
Now that we have integrated both source codes of TBIA plugin and Lyra's, we can continue and prepare Lyra's Hero Blueprint which represents our player character in Lyra-based projects.
- Open the project in the Unreal Engine editor.
- In the Content Browser panel, go to
Content/Characters/Heroes1 and open the assetB_Hero_Default2.
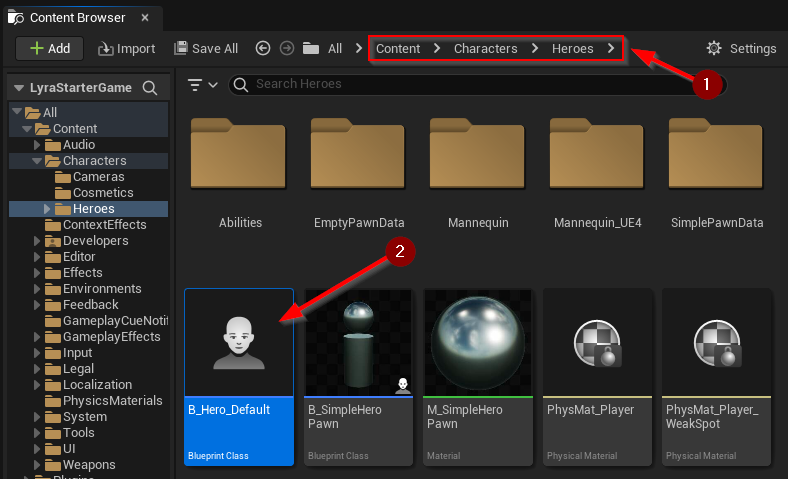
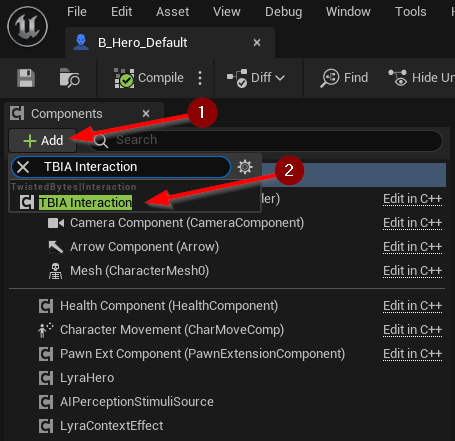
- Click Add 1 to add new component
TBIA Interaction2.
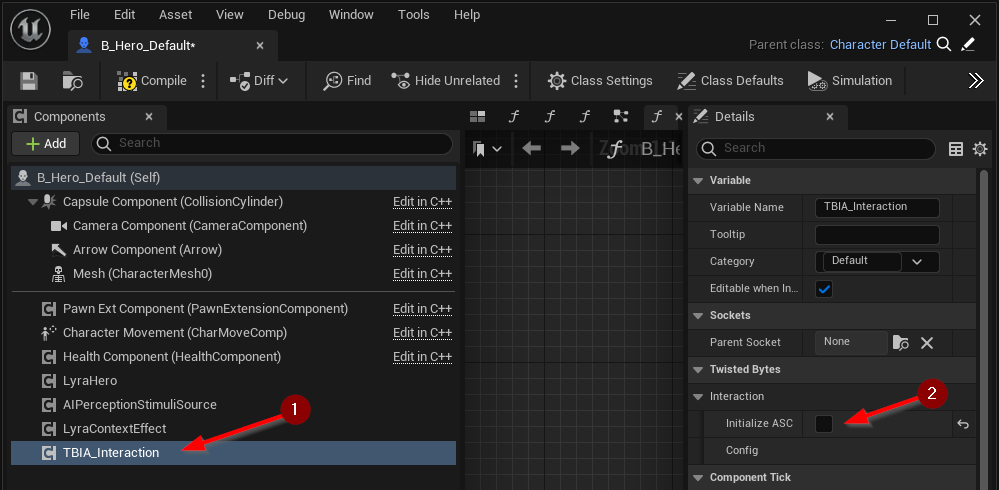
- In the Components panel, select the
TBIA_Interaction1 component. - In the Details panel, navigate to
Twisted Bytes | Interactionand setInitialize ASC2 tofalse.
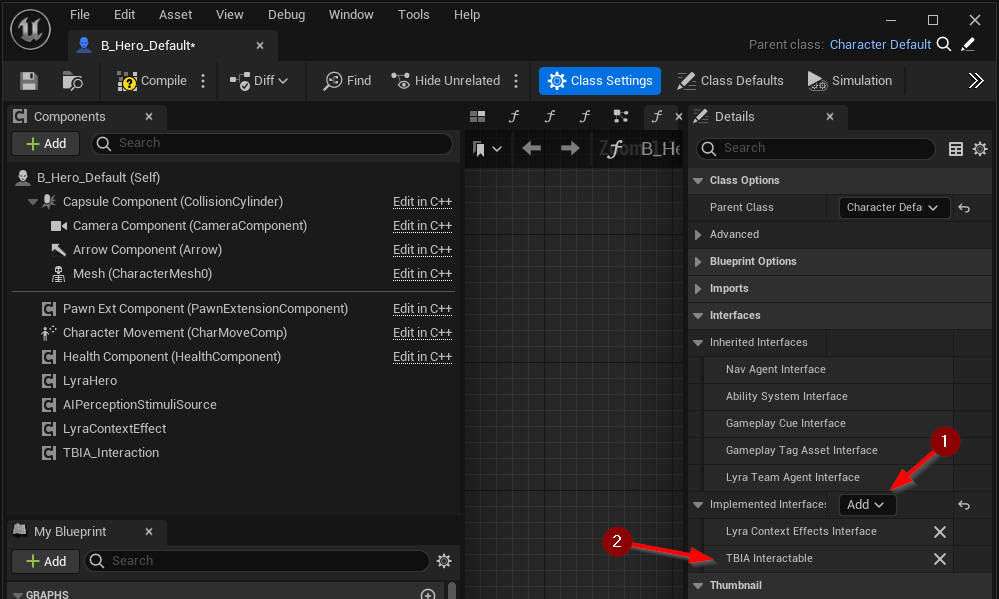
- Go to the Class Settings.
- In the Details panel, navigate to
Interfaces | Implemented Interfaces. - Click the Add button 1 and add the
TBIA Interactable2 interface.
- In the My Blueprint panel, navigate to
Interfaces | Twisted Bytesand double-click onGet Character Context1 to implement this interface function. - Create a
Make TBIA_CharacterContext2 node and connect the output pin to theReturn Value3 of the Return Node. - Drag the
Mesh4 component from the Components panel onto thePrimary Mesh5 input pin of theMake TBIA_CharacterContextnode.

Congratulations! You just completed the integration of TBIA into your Lyra-based project.
Showcase: Lyra ShooterCore Experience
This section is meant to showcase on how you would now use TBIA in any "experience" like Lyra's ShooterCore.
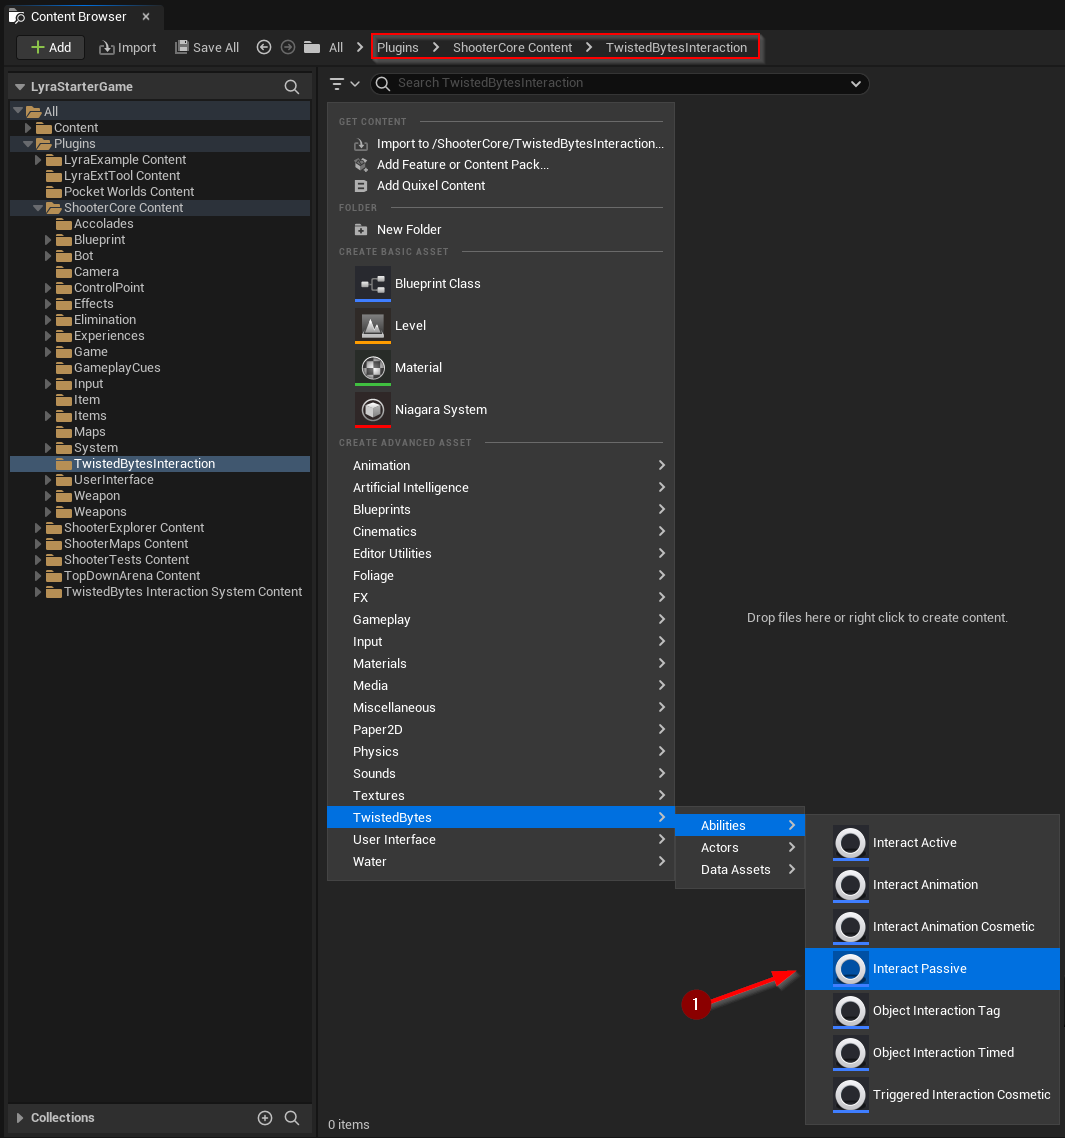
- In the Content Browser panel, go to
Plugins/Shooter Core Contentand create a new folderTwistedBytesInteraction. - Inside that new folder, create a new
Interact Passive1 Gameplay Ability for use in theShooterCoreexperience and name itGAInteractPassive.
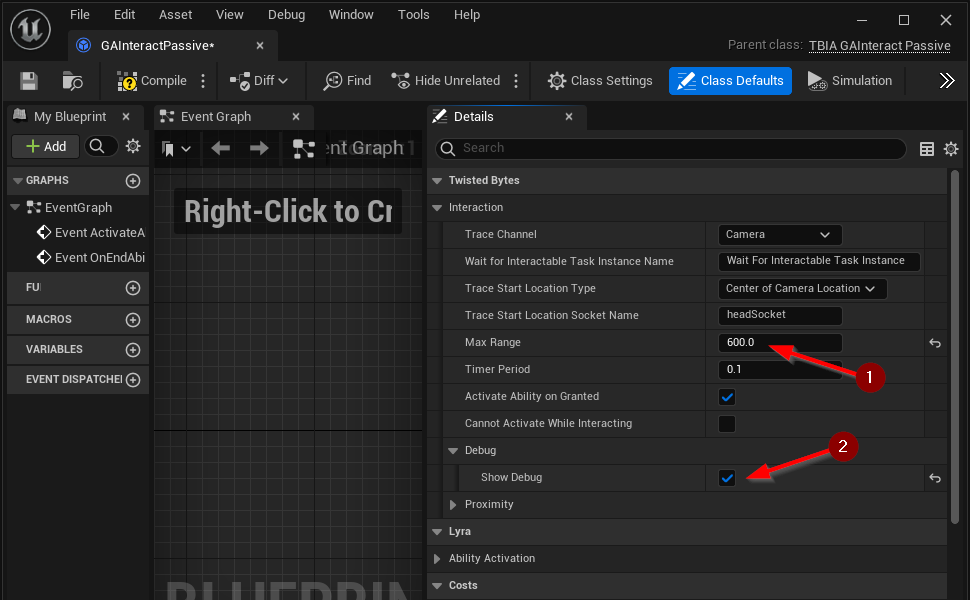
Now, for demonstration purposes, we would like to enable the debug visualization and also change the maximum trace length for this ability to make it easier for us to verify that everything works fine.
- Open the newly created
GAInteractPassiveGameplay Ability. - In the Details panel, navigate to
Twisted Bytes | Interactionand setMax Range1 to600. - In the Details panel, navigate to
Twisted Bytes | Interaction | Debugand setShow Debug2 totrue.
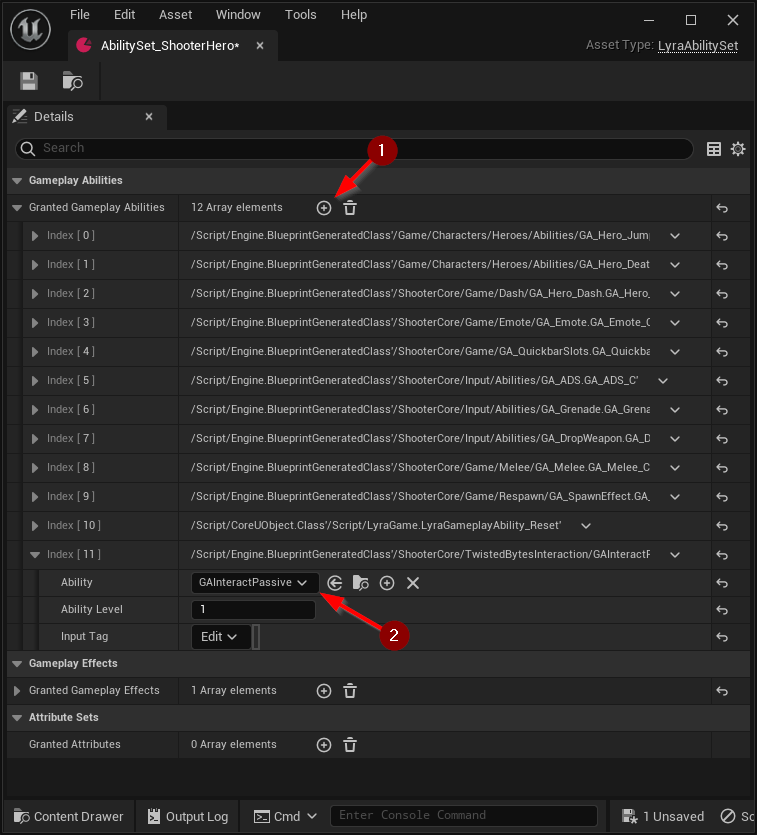
Finally, we need to tell Lyra about our new Gameplay Ability, so it will be granted to our player character.
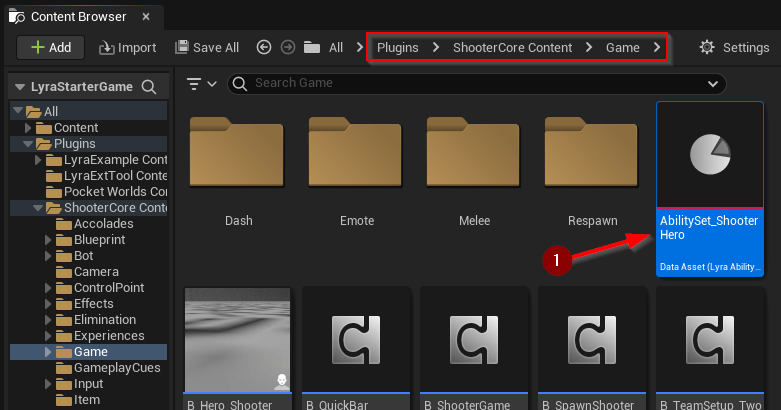
- In the Content Browser panel, go to
Plugins/Shooter Core Content/Gameand open the assetAbilitySet_ShooterHero1.
- In the Details panel, navigate to
Granted Gameplay Abilitiesand click on the+1 button. - For the new element at the end of the list, set
Ability2 to ourGAInteractivePassiveGameplay Ability.
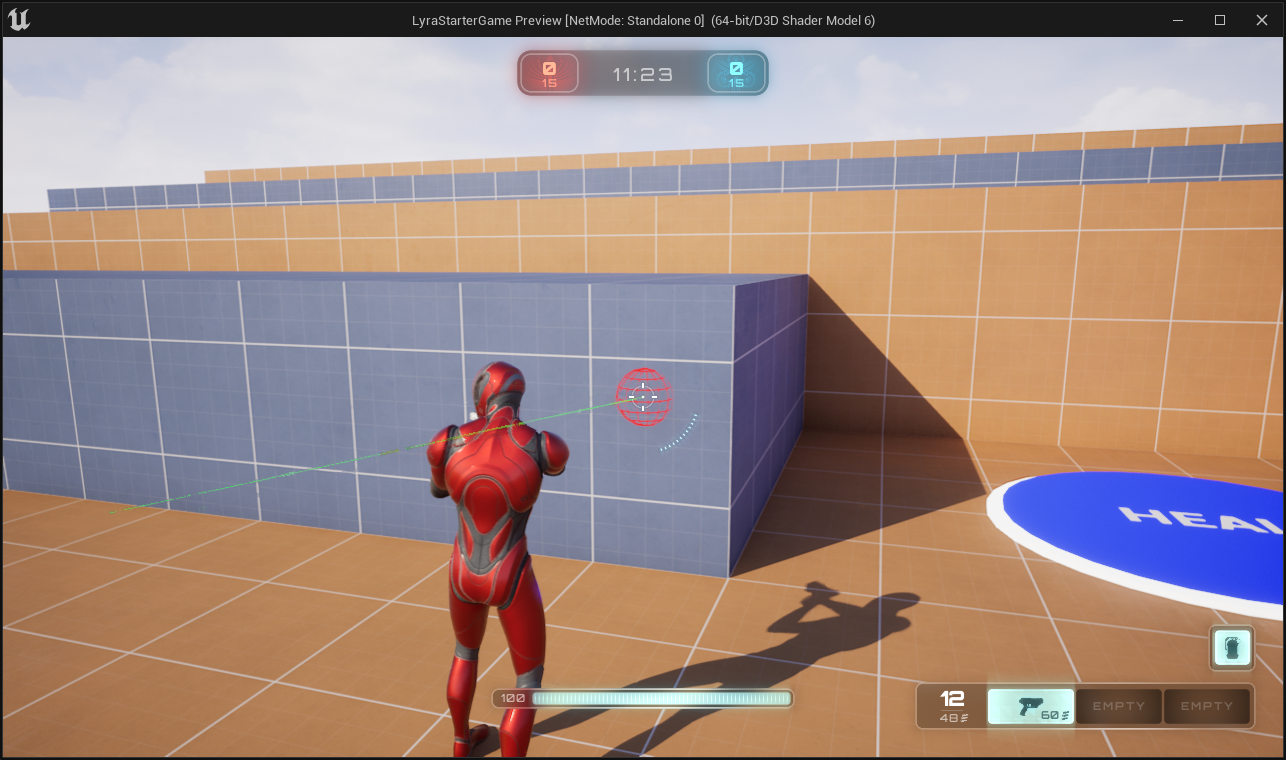
All done! Press Play in the editor and test it out.
Video Tutorial
We also provide a video tutorial to guide you through the integration process.